Doors
Many games use closed or locked doors to keep the player out of certain areas until they have completed earlier parts of the game, perhaps by having to find a key or being given one by another character as a reward for completing a quest.
In this tutorial we are going to create a doorway between a hallway and a study.
The Door
A closed door blocks the path between two locations, so it must exist as a static object in both of them.
We could place a separate "door" object at each location, but then it would be difficult to synchronise them so they are both open, closed or locked at the same time. Fortunately ADRIFT provides a better way. You can place a single static object in several locations by using a location group.
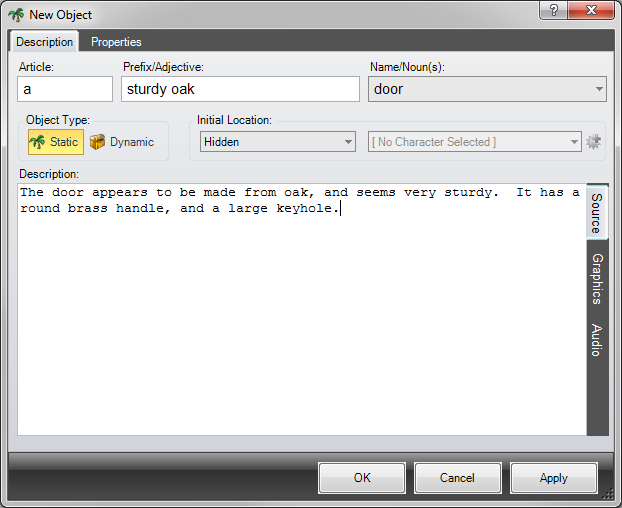
Start off by creating a door. This should be a static object, so click on the Object button on the main toolbar. Give the object a sensible name and description, like so:
Because we want this door to appear in two locations instead of one, rather than select Single Location from the dropdown, select Location Group. This allows the object to exist in any number of groups. Because we haven't yet defined a group, click on the  icon to create a new one.
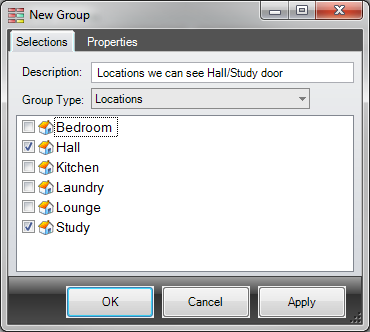
Give the group a sensible name, leave the Group Type as Locations, then select the location either side of the door, like so:
Click OK. The group should now be selected in the dropdown for the object location.
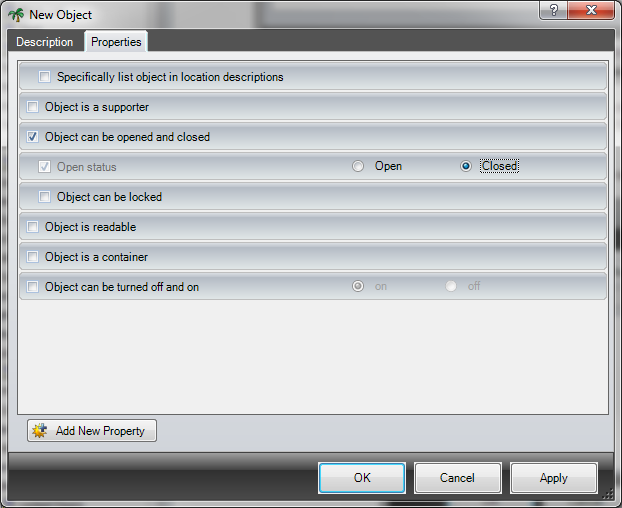
We now need to specify that the door can be opened and closed. Click on the Properties tab, and tick the Object can be opened and closed checkbox. Once ticked, this adds another couple of properties to the list, one of which is Open status. This defaults to Open, so change this to Closed like so:
Click OK to add the object. We will come back to this later when we discuss locking further down this tutorial.
Restricting movement
Now that we have an openable door object, we can use the status of this as a restriction in the player movement between the hall and the study.
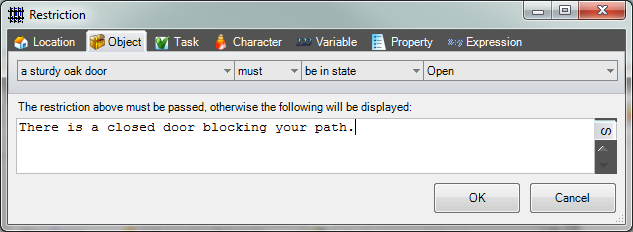
Open one of the locations (in this example we are editing the Study, but you could also edit the Hall), and select the Directions tab. Click on the icon next to the <No Restrictions Defined> entry against the direction you want to add the restriction. This will bring up the Restriction editor. Fill in the details like so:
Click OK. This will now list the restriction against the direction from one location to the other.
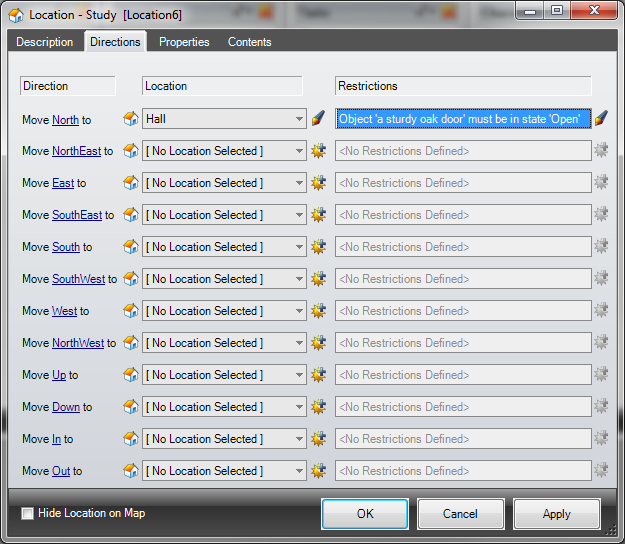
Click OK to update the location. If you have a restriction on the movement from one location to another, you may also want this same restriction on the movement the other way, so ADRIFT asks if you would like to copy the restriction over like so:
In this example, we do (because we also don't want to be able to move from the hall to the study unless the door is open), so click Yes.
If you save and play the game now, you should have a door between the two locations that must be opened to be able to move from one to the other.
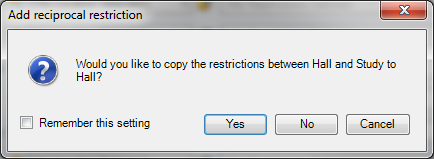
Describing the sides differently
Sometimes you might want the different sides of the doors to be described differently. For example, the outside might have a letterbox or knocker.
To do this, add an alternative description.
For example, we can append an additional description to the main door description by adding a restriction that the player must be in the hall. If so, we can say there's a sign on the door:
Likewise, you can add another alternative description for anything additional you want to say about the other side of the door.
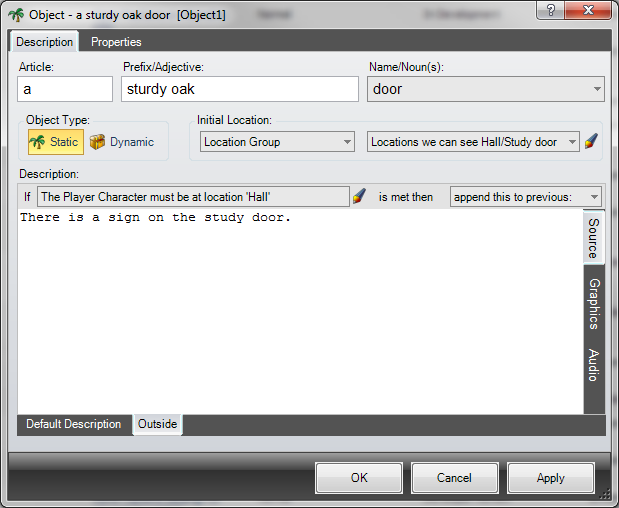
Locked Doors
The ADRIFT standard library has built in functionality for simple locks - that is one key per lock. To use this, we first need to create a key.
So create a new dynamic object, give it a suitable name, and set the initial location where you would like it to start off.
We now need to modify the door we created earlier. So double-click the door in the Objects list, and select the Properties tab.
Earlier, we said that the door can be opened and closed, but we didn't tick the Object can be locked property. Tick this now. You will see that it now adds an additional property, where the key must be specified. The Key for lock dropdown lists all the dynamic objects in the game. Select the key we just created.
Because we have said that the door can now be locked, the Open status of the door now offers an additional status of Locked. So change this dropdown from Closed to Locked.

Click OK to update the door.
If you now save your game, you should find that you have to unlock the door with the key before being able to open it.
Latched Doors
When a game requires the player to periodically return to a home base it will often provide a short-cut to a later area that only becomes available after the player has completed that area.
One way to do this is to have a door that can only be opened from one side.
Rather than making the door lockable, as above (which means we have to use a key), we can prevent the user from being able to open the door from one side, by adding an override on the open door action.
Repeat the steps above, to make a closable door.
Decide which side you want to block the route from, then right-click on the door object and select Add Specific Task > open door. This will bring up the New Task editor, pre-defined to override the Open objects task for the specified door.
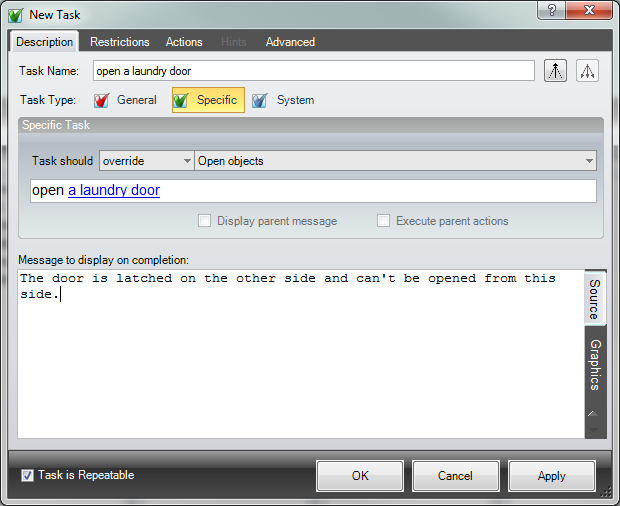
You also need to ensure that the task is repeatable, because you want to block the open command every time it is attempted, so tick the Task is Repeatable checkbox.
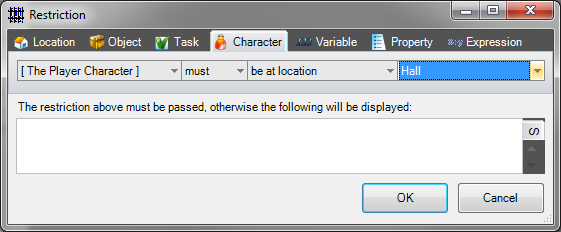
Click on the Restrictions tab, and add a restriction so that the above task only kicks in on the side of the door we don't want to be able to open, like so:
The description must be left blank, because if the character isn't in this location, we want the default task to run. If we did put a description in here, this task failing would still override the default task.
Click OK to add the restriction, then OK to add the task.
If you now save and run your game, you should find you can only open the door from one side.
If you wanted to be more descriptive you could add a similar specific task for the location on the side of the door we can open to display a more informative message such as "You lift the latch and slide the door open". This would be set to run before the general task with the Execute parent actions checkbox ticked so the door still opens. Display parent message can optionally be selected if you want to display something like "(First lifting the latch)" followed by the default message.
You may want to create a static "Latch" object as part of the door (right-click on the door object and select Add Sub-Object) in case the player tries to "examine latch" or "open latch". The description could just say that the door can be opened easily from this side, but not the other. It would therefore be sensible to handle "open latch" to also open the door, but remember to only allow it from the correct side.
You may also want to consider adding a task to handle unlatching objects. And you might also want to override the unlock door command with a sensible message.