Libraries
A library is a pre-defined set of items, usually tasks and properties, that you can use within your game. Most games will use the same basic commands (such as go north, examine the object, pick up the object, inventory, talk to character etc). It would be silly for every author to have to write tasks to do these same things over and over, and so libraries allow commonly used functions to be pre-defined.
To see which libraries you currently have selected, go to Settings > Libraries.
This screen lists all libraries that have been defined. The default installation should add a reference to the Standard Library. Any library with a tick next to it will be used in any game you edit.
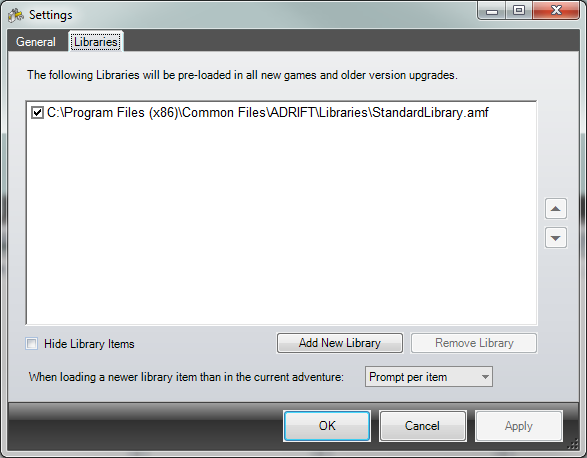
The default is for library items to be hidden. If you want to be able to see and edit library tasks directly in Developer, de-select the Hide Library Items checkbox.
You can add new libraries by clicking on the Add New Library button. Once added, you can enable or disable it by selecting the checkbox next to the item. You can remove the library permanently by selecting the Remove Library button.
Loading Libraries
Every time you load up an adventure, ADRIFT compares the items in your adventure with the items in the library. If the library has been updated, ADRIFT attempts to update your adventure with the updated library items. This is to take advantage of any improvements to the library. You can control the way ADRIFT updates your adventure by selecting one of the following from the When loading a newer library item than in the current adventure dropdown:
ADRIFT supports multiple libraries. This means you can create libraries that do specific things (for example, you could have a day/night/time system packaged up in a separate library), or a layered clothing library, or a battle system. Because these are fairly bespoke things that not everyone would want, they can be split out into separate libraries. If you want to include the functionality from one particular library, all you need to do is select that library.
If two libraries reference the same key (for example, the standard library has a "Look" task with the key "Look", and you might have a DayNight library task that had a customised version of the "Look" task, also with the key "Look"), then one of two things can happen. If the task from the second library has the On load, if another task exists with the same key, this should replace it checkbox selected (see the Advanced section of tasks), then the second Look will override the first one, and only one Look task will be imported. If neither of the tasks has this checkbox, or the first one does, then both tasks will be imported. For this reason, the order that libraries are loaded is important. You can change the order that they are loaded with the Up and Down buttons.
Creating Libraries
Library files are just ADRIFT Modules. However, careful consideration needs to be made before creating a library.
Keys
If ADRIFT loads a library with the same key as found in another library or the main adventure, you may find that your library item is overridden by the other item. To prevent this, you should ensure your keys are unique. You can either do this by setting a unique key prefix in Options > Advanced, or by editing the library in a text editor such as Notepad, and replacing any key names with something more suitable. NB - if you do this, you should ensure you also change the names of any keys referenced elsewhere in the library.
However, you should also ensure that any items that are designed to override standard items (for example, if you have configured a "Look" task that should override the standard library task) then you should also ensure that this key is identical to the standard library key.
Amendments
Currently, ADRIFT only lets you export an entire game as a module (there is an outstanding item to enhance this). This means, that if you wish to create a library, you need to make a few small tweaks to the module. To do this, edit the module created in a text editor such as Notepad, then remove the following sections:
You can then save the text file, and add it as a library.
NB. This process will be automated soon.